A few years back we had to setup authentication measures in our email to ensure that our email will not be tagged as SPAM by the email server of our intended recipient. We incorporated SPF and DKIM into our email infrastructure by adding TXT records into our DNS. These are the specifications put in place by DMARC.
Brief History of DMARC
DMARC stands for Domain-based Message Authentication, Reporting & Conformance.
Efforts to put up a system to combat fraudulent emails started in 2010 and the specification was published on January 30, 2012.
The founding contributors for DMARC are
- Receivers: AOL, Comcast, GMail, Hotmail, Netease, Yahoo! Mail
- Senders: American Greetings, Bank of America, Facebook, Fidelity, JPMorgan Chase & Co., LinkedIn, PayPal
- Intermediaries & Vendors: Agari, Cloudmark, ReturnPath, Trusted Domain Project
What is SPF?
According to Wikipedia:
Sender Policy Framework (SPF) is an email authentication method designed to detect forging sender addresses during the delivery of the email. SPF alone though is limited only to detect a forged sender claimed in the envelope of the mail which is used when the mail gets bounced. Only in combination with DMARC it can be used to detect forging of the visible sender in emails (email spoofing[1]), a technique often used in phishing and email spam.
SPF allows the receiving mail server to check during mail delivery that a mail claiming to come from a specific domain is submitted by an IP address authorized by that domain's administrators.[2] The list of authorized sending hosts and IP addresses for a domain is published in the DNS records for that domain.
SPF is useful for those using email campaign services like Campaign Monitor or Mailchimp. Adding an SPF record of those email services to your DNS gives authenticity to the emails they are sending.
What is DKIM?
According to Wikipedia:
DomainKeys Identified Mail (DKIM) is an email authentication method designed to detect forged sender addresses in emails (email spoofing), a technique often used in phishing and email spam.
DKIM allows the receiver to check that an email claimed to have come from a specific domain was indeed authorized by the owner of that domain.[1] It achieves this by affixing a digital signature, linked to a domain name, to each outgoing email message. The recipient system can verify this by looking up the sender's public key published in the DNS. A valid signature also guarantees that some parts of the email (possibly including attachments) have not been modified since the signature was affixed.[2] Usually, DKIM signatures are not visible to end-users, and are affixed or verified by the infrastructure rather than the message's authors and recipients.
How to setup email authentication for a Google Apps email account.
You need to add a TXT record to your DNS setting. If there is an existing SPF record, you need to update it to include the SPF record of the Google Suite
The SPF record for a Google suite account is v=spf1 include:_spf.google.com ~all
Read here for more info.
The DKIM is unique per account and you have to generate it in Google Admin. Here's the step by step guide on how to do that.
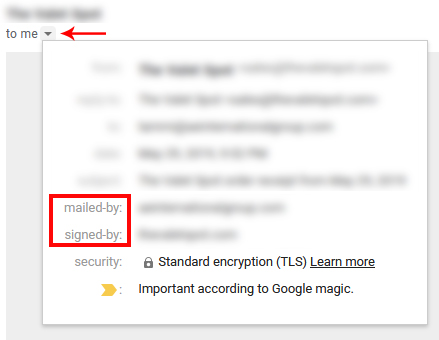
How to check if the SPF and DKIM records are active.
The email that is coming from the domain you've set up the records on should reflect the correct domain under the "Mailed by" and "Signed by" sections of the email headers. The email header can be checked by clicking the inverted triangle below the email sender's name as shown below.